Search This Blog

Tuesday, January 15, 2013

Poor Man's Chili

I know, I know, I've already made a chili post. But this one is different. You see, I recently lost my job and had to pull some things together to make a meal for my family. In my experience, when you're low on cash and need to feed people for a few days, you put lots of stuff in a pot and everyone gets a bowl or two every day until it's gone. So with all that said, behold: my poor man's chili.

First, we have almost a pound of ground beef. Brown it in a big pot. You want to make sure that it's completely cooked, especially if you get el cheapo meat like I did. This is the part of cooking that will actually cook the meat, and therefore will kill anything nasty that may be growing in it. We also bought a few onions that were on sale, so I chopped one up and threw it in once the meat had browned.


After the meat and bacteria are thoroughly killed and browned, and the onions have cooked clear, add canned tomatoes and canned chili beans. We had a few cans of beans left in the cabinet (because I love to throw together burritos when I need something fast), so I tossed in a big can and a small can.


Then stir and boil for about fifteen minutes.


We didn't have enough volume at this point, so I added an old can of Manwich stuff. This is like sweet tomato puree, so it changed the whole pot in one fell swoop.


I didn't like the smell. It took the onion punch and left it smelling like a cookie or something. So sweet. But it did make the volume and the consistency I was after.


So the only thing left to do was spice it up to try to mask the sugar in the Manwich additive. Chili powder, garlic powder, onion powder, ground cayenne, whole red pepper flake, and cumin were tossed in. Salt and pepper also made things smell less like a bakery and more like a tex mex place.


After about an hour of simmering, I took a look at a sample spoonful of the chili. Notice that all the major groups are represented: meat, tomato, onion, and bean. We're set.


To make things go even further, I boiled up some medium grain white rice and splurged with some shredded colby cheese (happened to be on sale at the local grocer).


In the quick figuring of total cost, I think we spent around ten dollars for this meal, and if we happen to get twenty bowls out of it, well, that's a pretty good way of ensuring that everyone gets protein, fat, veg, and grain. Not too shabby if you're on a serious budget.

Oh, by the way, I didn't spice things up nearly enough for my tastes, so my bowl got some sriracha and frank's hot sauce treatment, but my daughter ate all hers without a complaint. Hot sauce is critical sometimes if you need to make something taste... well, not like itself. Go get a bottle of something and get used to it. It'll probably change everything to taste like the sauce, but sometimes that's better if you want to have the ability to eat everything in your cupboard.


Tuesday, September 25, 2012

Simple, fast, and clean

A thought occurred to me that I've been posting courageous foods on here, stuff that most people either don't buy the ingredients for, or methods that are a bit too out there. So last night I made a pretty modest dinner, but for everything to work out right, the timing had to be just so.

I'd like to take you through my process, step by step, so that you can see how even a three dish dinner can sometimes ramp up in frantic maneuvers, but if you have things ready to go, you can mitigate potential problems and wind up with a pretty decent meal, even if it's just tuna patties and sides.

I'll start with the prep work:


Tuna patties take a little while to set up, or combine and meld so that they don't fall apart. I make mine a little on the cake-ey side. If you want less cake and more crunch, use one egg. Two cans of tuna in water (I used the small cans, probably one big can would work), 1 small onion, 1 cup of seasoned breadcrumbs, ten saltines, salt, pepper, thyme, and cumin.


Start by whipping the crap out of your egg(s).


Add the tuna, break it up into tiny chunks. Big chunks will make the patties fall apart.


Add small minced onion. Again, small pieces so the patties keep their form.


Add the seasoned breadcrumbs and stir. Things should start firming up pretty quickly, but there will still be sogginess.


Add crushed saltines until the mix loses the wet soggy factor and starts to firm up. Add cumin, thyme, salt, and pepper to taste, then park it in the fridge while the rest of the meal gets prepped.


My first side dish is bok choy. It's a chinese leafy green with a celery-like stalk. Lots of good vitamins. Start the prep by chopping off the bottom of the head and rinsing everything completely in cold water.


The stalks like to hold sand and dirt, and the leaves sometimes get a little battered by shipping and harvesting. Look for bright green leaves and bright white veins.


To help everything cook fast, I slice my bok choy straight across and at 1cm or so. For a decent head you'll get a significant amount of stuff to cook, so make two batches. We'll cook it all tonight, but we'll need to let it simmer down before adding all of it to the pan. This will become clear soon.


Second side dish is nothing fancy: shells and cheese. I start the cooking process by boiling the water for the shells while melting some butter in a skillet with two cloves of garlic. Second skillet will be for the tuna patties, not turned on yet. Cover a plate with some paper towels (to drain the patties), and put your strainer in the sink for the shells.


Once the water is at full boil, add the shells and stir. Toss one half of the bok choy into the butter and cover tightly with a lid. Turn on the second skillet and add about a half inch of vegetable oil (something with a high smoke-point). Once the oil comes to temp (test by dropping a little bit of the patty mix in, if it bubbles, you're ready to go), make patties and drop them carefully. Stir shells, stir bok choy.


This is where the timing thing comes in. Every few seconds, check everything. The patties will need to be flipped once the outer edge starts to turn brown. I flip mine with a spatula-wooden spoon combo so that the oil doesn't splatter everywhere. The bok choy should be settling down into the butter, so the second half can be added to the pan. Stir the shells. Repeat this process for about six or seven minutes.


Drain the shells, stir the bok choy, flip the patties, move the pan for the shells off the hot burner, add cheese sauce stuff. Toss the shells onto the cheese to help melt it. Take cooked patties out and patty out more. Stir the bok choy. At this point, the leaves should start to disappear and the stalk should be more visible.


Once the patty situation is under control, stir the cheese sauce and bok choy more.


At this point, my meal was essentially complete after ten minutes of stove time. Just waiting for the last two patties to finish browning.


 Total time of everything was about twenty minutes. Would have probably been a little faster if I didn't stop to take pictures (some pics didn't make the cut), but not too bad for a quick filling meal for a Monday night.

I see some people read this blog, and some people ask me about techniques and so forth outside of the comments... Do any of you want me to do anything special or specific? Maybe a post about how I cut an onion? Maybe something about baking? Healthy? Paula Dean? Desserts? Hit me up, people, I aim to please.

Monday, August 20, 2012

Little Balls of Meat

I recently moved to Covington, and one of the things I quickly learned about the area is the huge amount of local butchers. I've been in a few of the shops, and while some look more presentable than others, the main idea is that local small shops seem to do meat better than the big chains.

I got a package deal from one local butcher (a fifty year old one) that included some ground chuck and ground sausage. Ordinarily, these would become tacos or cheeseburgers with some breakfast sausage patties thrown in for good measure, but today I wanted something a little different. We scored some free hoagie buns from the mother in law (who is on a low-carb diet), so I decided to try my hand at some meatball subs.

In a big bowl, drop in about a pound of ground beef. I use ground chuck because I like the mix of fat to protein. Seems to have a better flavor than some of the other 'cuts'.


Add to this about a half cup of fresh cut basil (which everyone should be growing) and as much garlic as you can stand. I used five big cloves, minced.


Add a pound of pork sausage. Mine was a little brown because it was frozen and I wanted to defrost it quickly in the microwave.


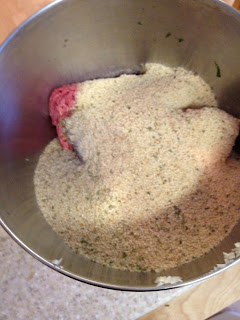
Add two eggs and two cups of breadcrumbs. We get a big carton of breadcrumbs already mixed with "Italian seasoning". Whatever, it tastes good, and is like a third of the price of fancy-pants panko crumbs.


Make sure your hands are clean, take off your rings, and get in there with your hands. Just mush everything up and don't stop until everything is equally mixed. If everything seems really dry and isn't combining together, add a half cup of milk or so.


The mix isn't really done until everything has noticeable tinges of green, white, brown, and red all throughout. Think play-dough as consistency for a good ball.


Spread out some foil on a cookie sheet (I used a half-sheet pan for mine), and roll the balls. If you plan on using these for spaghetti you may want them a bit smaller or bigger. Mine were a little larger than ping-pong ball sized.


I used a soup can for size demonstration.


Into a 400 degree (Fahrenheit, because I live in the states) oven for about twenty minutes. In this picture, my balls were cooking for about fifteen. They will drop a small amount of grease and get brown and crispy on the outside.


For the greater good, you have to sacrifice a ball. Just cut one in half to make sure the inside is brown.


For my subs, I baked the buns for about five minutes to get them crispy (they were pre-baked), and then spread some spicy marinara sauce on the bottom bun. Four half-balls to a bun.


Smother the meatballs with more sauce, then spread some mozzarella on top. Toss these back into the oven for a few minutes to melt the cheese and heat the sauce up.


Meatball subs were once the bane of my existence at local pizza shops. They were always dry, always made a big mess, and just didn't seem very edible.


With a side of chips and five minutes to wolf everything down, we were very pleased with how everything turned out.


The best part? We still have fourteen meatballs left over after these sandwiches to do with as we please. They should last a few days in the fridge or even longer in the freezer, but once you get a taste, they won't have to.

Monday, August 6, 2012

Lazy Sunday Beans

So I don't really have much time for this update, but I made some killer beans over the weekend. Here's what's up:

I quick-soaked a pound bag of white navy beans (boil them in water, let them sit for about an hour, then drain and add fresh water, bring to another boil), then started with the veggies.

I don't know why this picture won't stay in the center.

First, I sliced three big carrots into tiny slices.

I mean, really tiny slices. Shown is one of the fatter slices.


I sliced four stalks of celery in the same fashion, and also minced two pretty big onions (tennis ball size or so).


I needed some sort of fat/flavor to add to this, so I grabbed a 2 pound chunk of smoked ham and cut it into large cubes (more like rectangles, really). The ham is fully cooked, so it's just in there for flavor.


Cover and stir for about an hour.


I spiced things up with some paprika, parsley, sage, rosemary, and thyme (singing the song while I tossed the spices in, of course), pepper, and a little bit of cumin. I didn't salt this at all, partially because the ham is salty enough, really, and partially because I didn't want the beans to get all grainy and nasty.


Served up with some sour cream and a small dash of salt to taste, this turned out to be a pretty tasty meal. Everything made a sort of gelatinous blend, the celery and onions completely disintegrated, and the carrots hung around just enough to add some color. Total time to prepare was around four hours, including the time just waiting for the beans to soak and for the finished product to boil together. A good lazy Sunday meal, really.

Saturday, July 28, 2012

Fatty Greens Make Me Smile

Sometimes whole meals can be influenced by just one ingredient. I'm a fan of collard greens (really, greens of any shape or size), and picked up a nice looking bunch last time we went to the local grocery store. Looking around the kitchen, I didn't really see a meal materialize in front of me from all the stuff we had, so I peered deeper, and found a seed for a pretty good plate of food with this humble leafy green.

I start my greens with a source of fat. We had a rasher of bacon chillin in the fridge, so I chopped half of it and rendered it down.


This new stove cooks pretty fast, so I had to speed my normal leisurely process a bit: I rinsed the collards, chopped off the bottom stems, and rough chopped the leaves into 2" squares.


As soon as the chopping and so forth was done, the bacon was perfect. Just dark enough in color to show off the brown/red, no burnt parts, and no clear fatty parts. I added the greens and stirred. Within seconds, this dish was done. Note how the leaves get REALLY SHINY from all the bacon fat. Best part? The bacon lends so much flavor that you don't really have to season this dish at all.


With the star of the show complete, I had to find other complimentary dishes that I knew I could cook quickly. I was a line cook for a few years, so I know frozen chicken breasts can be cooked in a matter of minutes. I transferred the greens to a smaller pot (to keep them warm longer), and got to business.


I started with some olive oil, dropped the chicken (to make a dark crispy exterior), then added about a half cup of water to steam. Cover tightly for about 2 minutes. Then remove the breasts and chop into 2" cubes, return to the pan. Add some salt, pepper, garlic powder (not garlic salt, that stuff is horrible), and sage. Recover and stir occasionally until all the pink is gone from the interior of the meat.


I added a head of broccoli to give us some color and fiber and all that. Recover and let the broccoli get dark green but not brown.


One last thing: from the start I was also making a quick box of Uncle Ben's broccoli cream rice stuff. No one said you can't make some short cuts!